I made these cookies this morning and can I just say...YUM. I came across this recipe in the January 2012 issue of Bon Appetit. Let me just thank my dentist again for carrying that magazine. :) Not only are these tasty, full of whole grains, but super filling too! Seriously, I ate breakfast hours ago and I am still stuffed, which almost never happens.
Anyway, without further ado:
Almond Cranberry Quinoa Cookies (Yes, Quinoa. Trust me they're good, keep reading).
Makes about 2 dozen
1 1/2 cup of White Whole Wheat Flour
1 teaspoon Kosher Salt (if you use table/sea salt you won't need as much, more like 1/2 tsp.)
1/2 teaspoon baking powder
1/2 teaspoon baking soda
1/2 cup unsalted butter, At room temperature
(I used 1/4 cup unsalted butter and 1/4 cup unrefined coconut oil--super yum!)
1/4 cup sugar
1/4 cup packed brown sugar
1/4 cup honey
2 large eggs
1 teaspoon vanilla
1/2 teaspoon almond extract (Seriously, I have never been a fan of almond extract and was honestly hesitant to buy it, but thankfully it doesn't overwhelm the other flavors in this cookie--whew!)
1 cup COOKED quinoa, cooled
1 cup old fashioned oats
1 cup dried cranberries (or cherries)
1/2 cup slivered, unsalted almonds
Preheat oven to 375 degrees
In a medium bowl whisk together the dry ingredients; set aside. In a large bowl or mixer mix together the butter, sugars, and honey until light and fluffy. Add the eggs and extracts and mix until combined. Turn mixer to slow and add the dry ingredients until combined. Stir in the quinoa, oats, cranberries and almonds.
Drop by spoonfuls onto parchment lined cookie sheets and bake for 12-15 minutes, rotating the pan halfway through the cooking time. (I ended up baking mine for about 10 minutes).
These cookies are soft and almost like a muffin but so much easier. I mean seriously, do you like washing muffin tins? Because I don't!
Enjoy!
**A note about quinoa. If you haven't heard about it before it's an ancient grain similar to rice but packed with protein. I love it! Just make sure to rinse it before cooking. It's a 1 to 2 ratio, quinoa to liquid, simmer until liquid is gone. As a side dish I cook it with chicken broth, but obviously for these cookies I just used water.
Seriously, if you haven't tried it yet--do it today!
Showing posts with label Something Yummy. Show all posts
Showing posts with label Something Yummy. Show all posts
Friday, January 27, 2012

Tuesday, December 20, 2011
What's For Dinner? (This is a little long, sorry)
One of our new favorites found in the "Kid Friendly" section of The America's Test Kitchen Healthy Family Cookbook is Chicken Quesadillas (Seriously, if you don't have one of their cookbooks yet--Get One! It would also make a great gift.)
This does require a little preparation, but once prepped they go together fairly quickly. I wish that I had better pictures, but just the fact that I remembered to take them is pretty good! Unfortunately we didn't have any cilantro the night I made these--so you won't see it pictured here.
O.k. enough chit-chat--here's the info:
Ingredients:
2 Tablespoons canola oil
1 small red onion (when it comes to onion I always use about half of what the recipe calls for)
1 large red bell pepper, stemmed, seeded and chopped fine
3 ounces white mushrooms, brushed clean, trimmed and chopped fine
2 garlic cloves, minced
1 teaspoon chili powder
1 cup shredded cooked chicken breast (if needed you could used canned chicken here)
1/3 cup minced fresh cilantro
4 teaspoons fresh lime juice
Salt and pepper
4 (8in) whole wheat flour tortillas (We use our favorite Tortilla Land uncooked tortillas from Costco--they're not whole wheat but I'm not too worried about it).
1 cup shredded 50 percent light cheddar cheese (about 4 oz)--(We just use our favorite Tillamook Cheddar Cheese, not light--but again I'm not too worried about it).
Lime wedges for serving
**Optional Substitute 1 cup canned black beans, mashed, for the cooked chicken--or just use both like we do!

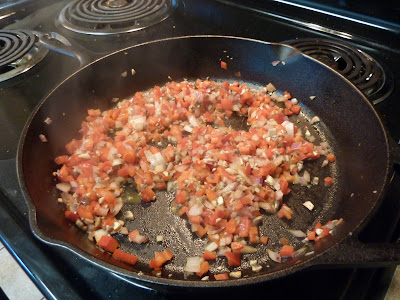


2. Stir in the cooked chicken and cook until heated through, about 1 minute. Off the heat, stir in the cilantro and lime juice and season with salt and pepper to taste.


This does require a little preparation, but once prepped they go together fairly quickly. I wish that I had better pictures, but just the fact that I remembered to take them is pretty good! Unfortunately we didn't have any cilantro the night I made these--so you won't see it pictured here.
O.k. enough chit-chat--here's the info:
Ingredients:
2 Tablespoons canola oil
1 small red onion (when it comes to onion I always use about half of what the recipe calls for)
1 large red bell pepper, stemmed, seeded and chopped fine
3 ounces white mushrooms, brushed clean, trimmed and chopped fine
2 garlic cloves, minced
1 teaspoon chili powder
1 cup shredded cooked chicken breast (if needed you could used canned chicken here)
1/3 cup minced fresh cilantro
4 teaspoons fresh lime juice
Salt and pepper
4 (8in) whole wheat flour tortillas (We use our favorite Tortilla Land uncooked tortillas from Costco--they're not whole wheat but I'm not too worried about it).
1 cup shredded 50 percent light cheddar cheese (about 4 oz)--(We just use our favorite Tillamook Cheddar Cheese, not light--but again I'm not too worried about it).
Lime wedges for serving
**Optional Substitute 1 cup canned black beans, mashed, for the cooked chicken--or just use both like we do!

Here's all the ingredients prepped and ready to go. If you want to save prep time--buy cheese pre-shredded and look for chopped onions and peppers in the grocery store. Or, if you have a food processor you could chop the veggies in a matter of seconds. If I know I need cooked chicken for a recipe, then I try to plan a dinner with baked chicken breasts earlier in the week and just bake extra chicken for meals like this.

1. Heat 2 teaspoons of the oil in a 12-inch nonstick skillet over medium heat until shimmering. Add the onion, bell pepper, and mushrooms and cook until softened and lightly browned, 8 to 10 minutes. (If you have one you could also add a jalapeno pepper here, seeded and chopped fine). Stir in the garlic and chili powder and cook until fragrant, about 30 seconds.

While the peppers are cooking I start cooking our tortillas--Are you hungry yet?

2. Stir in the cooked chicken and cook until heated through, about 1 minute. Off the heat, stir in the cilantro and lime juice and season with salt and pepper to taste.

This is when we add the black beans too. Stir to combine and heat through. Then if you don't have a separate grill for assembling the tortillas, transfer the filling to a separate bowl.
If you follow the recipe the next steps are:
3. Wipe the skillet clean with paper towels, return to medium heat and heat until hot, about 2 minutes. Lay the tortillas in the skillet, one at a time, and cook until softened and lightly toasted on both sides, 2 to 4 minutes. Transfer to a plate and cover with a clean towel to keep warm.

4. To assemble the quesadillas spread 2/3 cup of the filling over half of each tortilla, leaving a 1/2-inch border around the edge. Sprinkle 1/4 cup of the cheese over the filling, fold into a half-moon shape, and press lightly to flatten. (Obviously I stray from the recipe at this point--with 6 people in our family and a big griddle I make 2 full quesadillas at a time. I usually sprinkle a little cheese on the tortilla; Cover with the filling and then sprinkle a little more cheese on top of the filling. Then top with another tortilla).
Back to the Original Recipe
5. Working with two quesadillas at a time, brush one side of each with 1/2 teaspoon more oil, and arrange in the skillet, oiled-side down. Cook over medium heat until crisp and well browned on the first side, 1 to 2 minutes.
6. Brush the top of each quesadilla with 1/2 teaspoon more oil, flip them over, and continue to cook until crisp and well browned on the second side, 1 to 2 minutes longer. Transfer the quesadillas to a cutting board and repeat with the remaining two quesadillas and 2 teaspoons oil. Serve with lime wedges.

YUM!
Nutrition Info (if you follow the original recipe) Per Quesadilla: Cal 360; Fat 16 g; Sat. Fat 3.5g; Chol 40 mg; Carb 29g; Protein 23g; Fiber 3g; Sodium 230mg
Enjoy!
Monday, August 15, 2011
What Are You Having For Dinner?
One of the things I have wanted to do this summer is try new recipes. If you don't have one of "The America's Test Kitchen" cookbooks, run, don't walk to your nearest bookstore--or Amazon.com and get one. I highly recommend them! I have the original one and the healthy one (of course). This recipe comes from the healthy one. It is so good. I have been looking forward to making and eating it for days! Even though we just finished dinner, my mouth is watering just thinking about it--it's that good.
Spice-Rubbed Flank Steak with Toasted Corn and Black Bean Salsa
*Do not substitute frozen corn for the fresh corn here. Be sure to use a nonstick skillet when toasting the corn. (O.k. we don't have one of these but it works just fine in the skillet that we use). To make the salsa spicier, add the chile seeds.
Salsa
4 1/2 teaspoons extra-virgin olive oil
1 ear corn, kernels removed
3/4 cup canned black beans, rinsed
1 red bell pepper, stemmed, seeded, and chopped fine
1/2 jalapeno chile, stemmed seeded and minced
2 tablespoons minced fresh cilantro
2 tablespoons fresh lime juice
1 scallion, sliced thin
2 garlic cloves, minced
Salt and pepper
Steak
1 (1 1/2 pound) flank steak, trimmed of all visible fat
2 teaspoons ground cumin
2 teaspoons chili powder
1 teaspoon ground coriander
1/8 teaspoon cinnamon
1/8 teaspoon sugar
1/2 teaspoon salt
1/4 teaspoon pepper
2 teaspoons canola oil
1. For the Salsa: Heat 1 1/2 teaspoons of the olive oil in a 12 in. nonstick skillet over medium-high heat until shimmering. Add the corn and cook, stirring occasionally, until golden brown, about 4 minutes.
2. Transfer the corn to a large bowl, stir in the remaining tablespoon olive oil, beans, bell pepper, jalapeno, cilantro, lime juice, scallion, and garlic and season with salt and pepper to taste. Cover and let sit while cooking the steak.
3. For the Steak: Wipe out the skillet with paper towels. Pat the steak dry with paper towels. Mix the cumin, chili powder, coriander, cinnamon, sugar, salt, and pepper together, then sprinkle the spice mixture evenly over the meat.
4. Heat the canola oil in the skillet over medium-high heat until just smoking. Brown the steak well on the first side, 3 to 5 minutes. Flip the steak over, reduce the heat to medium, and cook until the meat registers 125 degrees on an instant-read thermometer (for medium-rare), 5 to 10 minutes longer, reducing the heat if the pan begins to scorch.
5. Transfer the steak to a carving board and let rest for 5 minutes. Slice the steak thin against the grain and serve with the corn salsa.
Per Serving: Cal 390; Fat 18g; Sat Fat 4.5g; Chol 55mg; Carb 15g; Protein 41g; Fiber 5g; Sodium 550mg
To Make Ahead: The corn salsa can be refrigerated in an airtight container for up to 2 days. Season with additional fresh lime juice, salt, and pepper to taste before serving.
I promise that this dish isn't really that spicy. Our kids haven't worked up the courage to eat it with the salsa--oh well, more for me! I love to eat this with quinoa--steak, salsa and quinoa all mixed together--amazing!
Quinoa is faster than steaming rice. I just take one cup of quinoa, rinsed. Place it in a pot with 2 cups of chicken broth. Bring to a boil and then lower the heat, cover the pan and let simmer until all the moisture has been absorbed. If you eat this just as it is you will enjoy it more with a little salt and pepper (and maybe butter). However, when combined with the salsa it does not need anything to add flavor.
Enjoy!
Spice-Rubbed Flank Steak with Toasted Corn and Black Bean Salsa
*Do not substitute frozen corn for the fresh corn here. Be sure to use a nonstick skillet when toasting the corn. (O.k. we don't have one of these but it works just fine in the skillet that we use). To make the salsa spicier, add the chile seeds.
Salsa
4 1/2 teaspoons extra-virgin olive oil
1 ear corn, kernels removed
3/4 cup canned black beans, rinsed
1 red bell pepper, stemmed, seeded, and chopped fine
1/2 jalapeno chile, stemmed seeded and minced
2 tablespoons minced fresh cilantro
2 tablespoons fresh lime juice
1 scallion, sliced thin
2 garlic cloves, minced
Salt and pepper
Steak
1 (1 1/2 pound) flank steak, trimmed of all visible fat
2 teaspoons ground cumin
2 teaspoons chili powder
1 teaspoon ground coriander
1/8 teaspoon cinnamon
1/8 teaspoon sugar
1/2 teaspoon salt
1/4 teaspoon pepper
2 teaspoons canola oil
1. For the Salsa: Heat 1 1/2 teaspoons of the olive oil in a 12 in. nonstick skillet over medium-high heat until shimmering. Add the corn and cook, stirring occasionally, until golden brown, about 4 minutes.
2. Transfer the corn to a large bowl, stir in the remaining tablespoon olive oil, beans, bell pepper, jalapeno, cilantro, lime juice, scallion, and garlic and season with salt and pepper to taste. Cover and let sit while cooking the steak.
3. For the Steak: Wipe out the skillet with paper towels. Pat the steak dry with paper towels. Mix the cumin, chili powder, coriander, cinnamon, sugar, salt, and pepper together, then sprinkle the spice mixture evenly over the meat.
4. Heat the canola oil in the skillet over medium-high heat until just smoking. Brown the steak well on the first side, 3 to 5 minutes. Flip the steak over, reduce the heat to medium, and cook until the meat registers 125 degrees on an instant-read thermometer (for medium-rare), 5 to 10 minutes longer, reducing the heat if the pan begins to scorch.
5. Transfer the steak to a carving board and let rest for 5 minutes. Slice the steak thin against the grain and serve with the corn salsa.
Per Serving: Cal 390; Fat 18g; Sat Fat 4.5g; Chol 55mg; Carb 15g; Protein 41g; Fiber 5g; Sodium 550mg
To Make Ahead: The corn salsa can be refrigerated in an airtight container for up to 2 days. Season with additional fresh lime juice, salt, and pepper to taste before serving.
I promise that this dish isn't really that spicy. Our kids haven't worked up the courage to eat it with the salsa--oh well, more for me! I love to eat this with quinoa--steak, salsa and quinoa all mixed together--amazing!
Quinoa is faster than steaming rice. I just take one cup of quinoa, rinsed. Place it in a pot with 2 cups of chicken broth. Bring to a boil and then lower the heat, cover the pan and let simmer until all the moisture has been absorbed. If you eat this just as it is you will enjoy it more with a little salt and pepper (and maybe butter). However, when combined with the salsa it does not need anything to add flavor.
Enjoy!
Friday, June 17, 2011
Chocolate Cloud Cake
One of our favorite wedding presents--well maybe it's just one of my favorites, was a cookbook. "Classic Home Desserts," by Richard Sax.
It is fabulous! Everything I've made from this book is tasty. Not only that, these recipes have been collected from all over the world and have great history and stories to go with them. It's one of those cookbooks you could sit down and read cover to cover.
Anyway, I've mentioned this recipe a few times on our blog so for your baking pleasure I give you: Chocolate Cloud Cake
![]()
"This flourless cake is crammed with chocolate (use only the best) and rich with butter and will fall slightly as it cools. The center is filled with softly whipped cream and sprinkled with cocoa powder--intensity, then relief in each bite." ~Richard Sax
~ Makes one 8-inch single-layer cake; serves 8 to 12
CAKE
8 ounces best-quality bittersweet or semisweet chocolate, coarsely chopped
(Confession--many times I've just used chocolate chips)
1/2 cup (1 stick) unsalted butter, cut into pieces, softened
6 large eggs; 2 whole, 4 separated
1 cup sugar
2 tablespoons cognac or Grand Marnier (optional)
Grated zest of 1 orange (optional)
WHIPPED CREAM TOPPING
1 1/2 cups heavy cream, well chilled
3 tablespoons confectioners' sugar
1 teaspoon pure vanilla extract
Unsweetened cocoa powder, for sprinkling
1. CAKE: Preheat the oven to 350 degrees. Line the bottom of an 8-inch springform pan with a round of wax paper; do not butter the pan. Melt the chocolate in a double boiler or in a bowl set over hot water. (Or like I do--in the microwave. :)) Remove from the heat and whisk in the butter until melted; set aside.
2. In a bowl, whisk the 2 whole eggs and the 4 egg yolks with 1/2 cup of the sugar just until blended. Whisk in the warm chocolate mixture. Whisk in the optional cognac or Grand Marnier and the optional orange zest. (I've never used either one, but I think the next time I make this I will try the orange).
3. In another bowl, with an electric mixture, beat the 4 egg whites until foamy. Gradually add the remaining 1/2 cup sugar and beat until the whites form soft mounds that hold their shape but are not quite stiff. Stir about 1/4 beaten egg whites into the chocolate mixture to lighten it; gently fold in the remaning whites. Pour the batter into the pan; smooth the top.
4. Bake until the top of the cake is puffed and cracked and the center is no longer wobbly, usually 35 to 40 minutes. Do not overbake.
5. Cool the cake in the pan on a wire rack; the cake will sink as it cools, forming a crater with high sides.
6. WHIPPED CREAM TOPPING: At serving time, whip the cream with the confectioners' sugar and vanilla until not quite stiff. With a spatula, carefully fill the crater of the cake with the whipped cream, pushing it gently to the edges. Dust the top lightly with cocoa powder. Run the tip of a knife around the edges of the cake; carefully remove the sides of the pan and serve.
It is fabulous! Everything I've made from this book is tasty. Not only that, these recipes have been collected from all over the world and have great history and stories to go with them. It's one of those cookbooks you could sit down and read cover to cover.
Anyway, I've mentioned this recipe a few times on our blog so for your baking pleasure I give you: Chocolate Cloud Cake

As much as I'd like to take credit for this picture, I didn't take it. It's straight from the cookbook.
~ Makes one 8-inch single-layer cake; serves 8 to 12
CAKE
8 ounces best-quality bittersweet or semisweet chocolate, coarsely chopped
(Confession--many times I've just used chocolate chips)
1/2 cup (1 stick) unsalted butter, cut into pieces, softened
6 large eggs; 2 whole, 4 separated
1 cup sugar
2 tablespoons cognac or Grand Marnier (optional)
Grated zest of 1 orange (optional)
WHIPPED CREAM TOPPING
1 1/2 cups heavy cream, well chilled
3 tablespoons confectioners' sugar
1 teaspoon pure vanilla extract
Unsweetened cocoa powder, for sprinkling
1. CAKE: Preheat the oven to 350 degrees. Line the bottom of an 8-inch springform pan with a round of wax paper; do not butter the pan. Melt the chocolate in a double boiler or in a bowl set over hot water. (Or like I do--in the microwave. :)) Remove from the heat and whisk in the butter until melted; set aside.
2. In a bowl, whisk the 2 whole eggs and the 4 egg yolks with 1/2 cup of the sugar just until blended. Whisk in the warm chocolate mixture. Whisk in the optional cognac or Grand Marnier and the optional orange zest. (I've never used either one, but I think the next time I make this I will try the orange).
3. In another bowl, with an electric mixture, beat the 4 egg whites until foamy. Gradually add the remaining 1/2 cup sugar and beat until the whites form soft mounds that hold their shape but are not quite stiff. Stir about 1/4 beaten egg whites into the chocolate mixture to lighten it; gently fold in the remaning whites. Pour the batter into the pan; smooth the top.
4. Bake until the top of the cake is puffed and cracked and the center is no longer wobbly, usually 35 to 40 minutes. Do not overbake.
5. Cool the cake in the pan on a wire rack; the cake will sink as it cools, forming a crater with high sides.
6. WHIPPED CREAM TOPPING: At serving time, whip the cream with the confectioners' sugar and vanilla until not quite stiff. With a spatula, carefully fill the crater of the cake with the whipped cream, pushing it gently to the edges. Dust the top lightly with cocoa powder. Run the tip of a knife around the edges of the cake; carefully remove the sides of the pan and serve.
Tuesday, November 17, 2009
Can You Smell That?


It smells like the holidays! I couldn't help myself. I've been craving these cookies for a while. They made our house smell so good! We made a big batch to share with neighbors and friends, but I think we will have to make some more--they are that good! In the spirit of the holidays, of feeling grateful and appreciating good friends I would like to share this recipe with you. It comes from one of my favorite cook books, The America's Test Kitchen Family Cookbook. If you're thinking about getting a new cookbook I highly recommend this one-it's fabulous!
Molasses Spice Cookies
Makes: About 2 dozen
Prep Time: 5 minutesTotal Time: 35 minutes plus cooling time
1/2 cup plus 1/3 cup granulated sugar
2 1/4 cups all-purpose flour1 teaspoon baking soda
1 1/2 teaspoons cinnamon
1 1/2 teaspoons ginger
1/2 teaspoon cloves
1/4 teaspoon allspice
1/4 teaspoon pepper (yes, pepper!)
1/4 teaspoon salt
12 tablespoons (1 1/2 sticks) unsalted butter, softened--(this is critical for big, soft cookies. The butter can't be cold at all)
1/3 cup packed dark brown sugar
1 large egg yolk
1 teaspoon vanilla extract
1/2 cup light or dark molasses (not blackstrap)
2. Beat the butter, brown sugar, and remaining 1/3 cup granulated sugar together in a large bowl using an electric mixer on medium speed until light and fluffy, 3 to 6 minutes. Beat in the egg yolk and vanilla until combined, about 30 seconds. Beat in the molasses until incorporated, about 30 seconds, scraping down the bowl and beaters as needed.
3. Reduce the mixer speed to low and slowly mix in the flour mixture until combined, about 30 seconds (the dough will be soft). Give the dough a final stir with a rubber spatula to make sure it is combined.
4. Using wet hands, roll 2 tablespoons of dough at a time into balls, then roll in the sugar to coat and lay on two parchment-lined baking sheets, spaced about 2 inches apart. Bake the cookies, one sheet at a time, until the edges are set and the tops are cracked but the centers are still soft and underdone (peek through the cracks to check the centers), 10-12 minutes, rotating the baking sheet halfway through baking.
5. Let the cookies cool on the baking sheet for 10 minutes, then serve warm or transfer to a wire rack and let cool completely.
Enjoy!!
Subscribe to:
Posts (Atom)